
What is Cubit in Flutter?
Flutter has gained immense popularity among developers for creating gorgeous and responsive applications for mobile, web, and desktop. One of the key concepts in Flutter development is state management,and this is where Cubit comes into play. In this article, we’ll explore what Cubit is, how it fits into state management, its benefits, practical tips for implementation, and more.
Understanding State Management in Flutter
Before diving into Cubit, let’s briefly understand state management in Flutter. state management is the way we handle changes in the app’s state, ensuring that the UI reflects these changes seamlessly.
Various approaches to state management exist in Flutter, including:
- Provider
- Bloc
- riverpod
- GetX
- Cubit
Among these, Cubit offers a simple and effective way to manage state without the complexity of more extensive solutions like Bloc.
What is Cubit?
Cubit is a lightweight state management solution that is part of the Bloc library created by Felix Angelov. Cubit provides a simplified API, making it easier for developers to manage and emit states within their applications. Unlike Bloc, which requires events to trigger state changes, Cubit allows for a more straightforward approach where developers simply call methods to update the state.
Key Features of Cubit
- Simplicity: Cubit’s API is straightforward,making it easy to learn and integrate into Flutter applications.
- Minimal Boilerplate: Unlike other state management solutions, Cubit minimizes the amount of boilerplate code, allowing for cleaner codebases.
- Strong Performance: Cubit’s design focuses on efficient state updates, which can lead to better performance in applications.
- Testability: Cubit promotes test-driven development by allowing you to easily test states without complex setups.
Setting Up Cubit in a Flutter Application
To implement Cubit in your Flutter application, follow these steps:
Step 1: Add Dependencies
First, you need to add the required dependencies in your pubspec.yaml file:
yaml
dependencies:
flutter:
sdk: flutter
flutter_bloc: ^8.0.0 # Use the latest version
“`
Step 2: Create a Cubit Class
Create a new class that extends Cubit. this class will hold the current state and provide methods to emit new states.
“`dart
import ‘package:flutter_bloc/flutter_bloc.dart’;
class CounterCubit extends Cubit
CounterCubit() : super(0); // initial state
void increment() => emit(state + 1);
void decrement() => emit(state – 1);
}
“`
Step 3: Provide the cubit
Wrap your application (or a part of it) with the BlocProvider to make the Cubit available to child widgets:
“`dart
import ‘package:flutter/material.dart’;
import ‘package:flutter_bloc/flutter_bloc.dart’;
void main() {
runApp(MyApp());
}
class MyApp extends StatelessWidget {
@override
Widget build(BuildContext context) {
return BlocProvider(
create: (context) => CounterCubit(),
child: MaterialApp(
home: CounterScreen(),
),
);
}
}
“`
Step 4: Consuming the cubit
Use BlocBuilder to rebuild your widgets when the Cubit state changes:
“`dart
class CounterScreen extends StatelessWidget {
@override
Widget build(BuildContext context) {
return Scaffold(
appBar: AppBar(title: Text(‘Cubit Counter’)),
body: Centre(
child: BlocBuilder
builder: (context, count) {
return Text(‘Current count: $count’);
},
),
),
floatingActionButton: Row(
mainAxisAlignment: MainAxisAlignment.center,
children:[[
floatingactionbutton(
onPressed: () => context.read
tooltip: ‘Decrement’,
child: Icon(Icons.remove),
),
SizedBox(width: 20),
FloatingActionButton(
onPressed: () => context.read
tooltip: ‘Increment’,
child: Icon(Icons.add),
),
],
),
);
}
}
“`
Benefits of Using Cubit
Utilizing Cubit in your Flutter applications offers several advantages:
- Simplicity: Its straightforward approach makes it suitable for both beginners and experienced developers.
- Reduced Boilerplate Code: Less code leads to fewer errors and enhances maintainability.
- Scalability: Cubit can easily be scaled up for more complex applications without losing its simplicity.
- Improved Collaboration: Teams can work more effectively with clear,concise implementations.
Practical Tips for Implementing Cubit
Here are some valuable tips for effectively using Cubit in your Flutter applications:
- Keep States Simple: Onyl store essential data in your states to avoid performance issues.
- Combine with Repository Pattern: Use the repository pattern for managing data sources and keep your Cubit lean.
- Utilize Equatable: implement Equatable to compare states without boilerplate code.
- Testing: Make testing a priority by writing unit tests for your Cubit logic to ensure stability.
common Use cases for Cubit
Cubit is particularly effective in scenarios where:
| Use Case | Description |
|---|---|
| Simple Applications | Small apps with straightforward state requirements where simplicity is key. |
| Forms | Managing the states of user inputs, validations, and submission responses. |
| Counter Apps | Classic examples demonstrating how Cubit handles incremental or decremental logic. |
Case Studies and Real-World Applications
Several projects have successfully leveraged Cubit for their state management needs. Here are some notable examples:
- Todo Lists: A straightforward task manager utilizing Cubit to maintain the list state.
- game Score Trackers: Applications for tracking scores utilize Cubit to manage real-time updates efficiently.
- E-commerce Applications: These apps often use Cubit for managing user sessions, cart states, and checkout processes.
Conclusion
Cubit is an excellent choice for Flutter developers looking for a simple yet effective state management solution. With its minimal boilerplate, strong performance, and ease of use, it appeals to both newcomers and seasoned developers alike. By incorporating Cubit into your Flutter applications, you can create clean, maintainable code that scales well. Remember to keep your states simple, utilize proper testing practices, and experiment with the powerful features Cubit offers. Happy coding!
“`
RELATED POSTS
View all
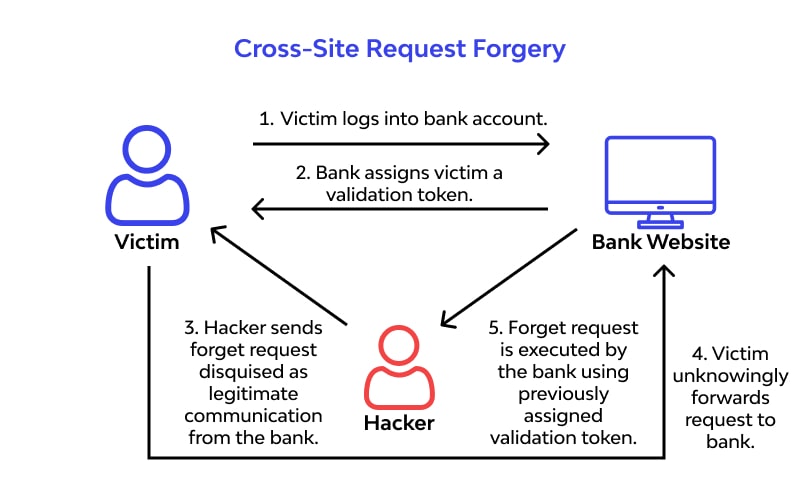
CSRF Attack Explained: How It Works & 5 Best Prevention Tips
February 14, 2025 | by Adesh Yadav
Learn Flutter: The Ultimate 2025 Guide for Beginners to Build Cross-Platform Apps
February 12, 2025 | by Adesh Yadav

FlutterFlow vs Flutter: Which is Best for Your App Development?
February 12, 2025 | by Adesh Yadav